
Click  Design Parameters on the ParkCAD toolbar or ribbon.
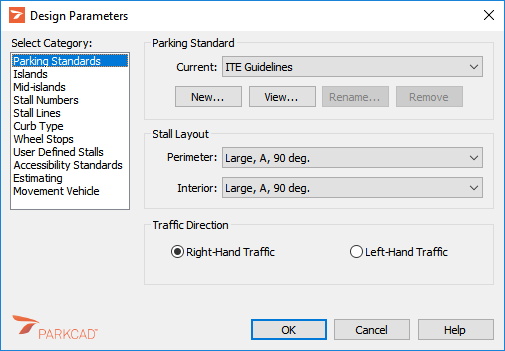
Click the Parking Standards category. The following dialog box displays:
 < p>
< p>
Design Parameters - Parking Standards
Under Parking Standard, in the Current list, select the desired parking standard.
Under Stall Layout, select the desired perimeter and interior stall layouts. These layouts are used by the Generate Row and Generate Lot tools (see Tools -> Generate Row from Elements, Tools -> Generate Row from Points, and Tools -> Generate Lot from Boundary).
Click OK.
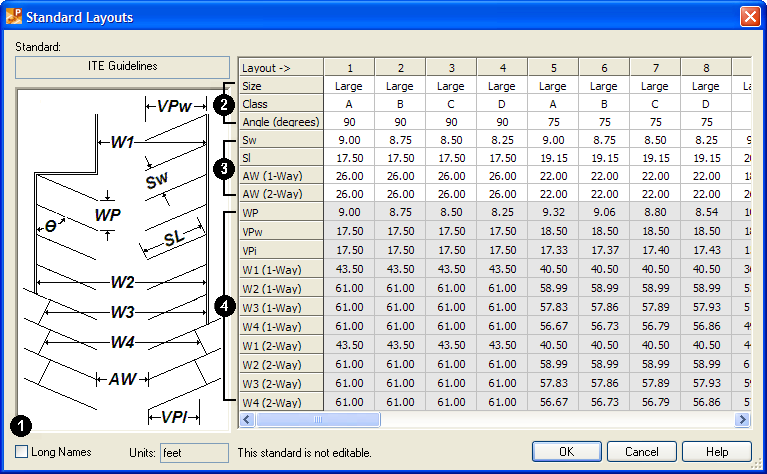
A parking standard is comprised of the following:
A set of three criteria (number 2 in the example below):
Layout Dimensions
These are illustrated in the Standard Layouts dialog box:

Parking Standard Layouts - Viewing
To display the full name of each dimension element, select the Long Names check box. This setting is off by default, displaying the short name.
Create new parking standards from scratch or copy and modify existing parking standards. A wizard is used to guide the user through the process of creating new parking standards. The wizard can create a matrix of combinations of each of the criteria called layouts or the user can opt to create the layouts manually. Once the user has supplied values for the required values ParkCAD automatically calculates the remaining values for the layout.
Click  Design Parameters on the ParkCAD toolbar or ribbon.
Click the Parking Standards category.
Click New.
Enter a name for the new parking standard.
Choose to either create a new parking standard (See Creating a New Parking Standard, next) or copy an existing parking standard you can then modify (See Copying an Existing Parking Standard, below).
Click Create New Standard.
Click Next.
Type a vehicle size then click Add.
Repeat the previous step to add more vehicle size categories then click Next.
Type a parking class then click Add.
Repeat the previous step to add more parking class categories then click Next.
Type a parking angle then click Add.
Repeat the previous step to add more parking angles then click Next.
Select the units of measure from the list then click Next.
Choose to have the New Standard Wizard create the layouts automatically then click Next. If you want to create the layouts manually, clear this check box.
Click Finish to confirm that you want to create the new standard.
The new parking standard will be created and the Standard Layouts dialog box displays.
Type the following required values for each Layout:
Note: If the stall length (SL) is not provided you can calculate the SL from the projected vehicle width (VPw) see Standard Layouts figure.
If only one value for aisle widths (AW) is available, use the same value for both one-way and two-way aisle widths.
See Generate Row from Points for information on creating a parking standard for use in generating parallel parking.
ParkCAD will calculate the remaining values in the layout (the values in grey).
When you are finished adding the required values, click Save then OK.
Click Copy and Modify Existing Standard.
Select the parking standard to copy from the list then click Next.
Type vehicle sizes then click Add and/or select vehicle sizes then click Remove to add and remove vehicle sizes from the list.
Click Next.
Type parking classes then click Add and/or select parking classes then click Remove to add and remove parking classes from the list.
Click Next.
Type parking angles then click Add and/or select parking angles then click Remove to add and remove parking angles from the list.
Click Next.
Select the units of measure from the list then click Next.
Choose to have the New Standard Wizard create the Layouts automatically. If you want to create the Layouts manually, clear this check box.
Choose to have the New Standard Wizard reuse the required values from the parking standard you are copying. If you want to supply new required values, clear this check box.
Click Next.
Click Finish to confirm that you want to create the new parking standard.
The new parking standard will be created and the Standard Layouts dialog box displays.
If you chose to create the layouts manually, click Add Layout, select each of the three criteria then type the required values.
ParkCAD will calculate the remaining values in the layout (the values in grey).
When you are done adding the required values, click Save then OK.
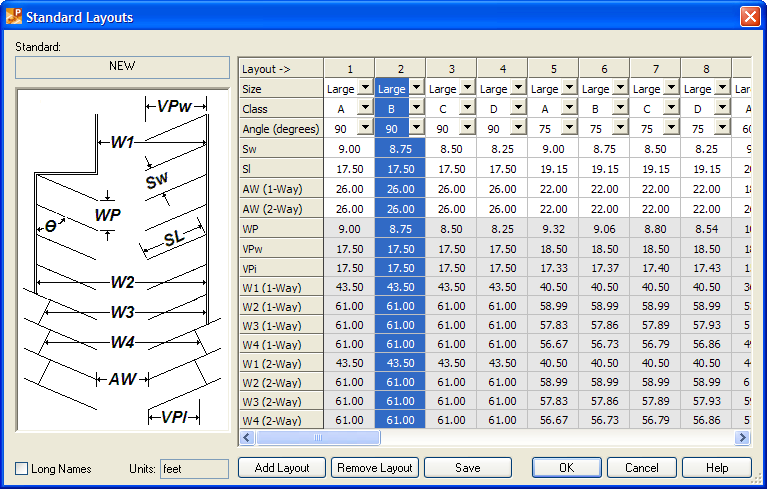
Editing allows the user to change criteria selections and edit required values as well as add and remove layouts to parking standards they have created.

Parking Standard Layouts - Editing
Click Add Layout then select the desired vehicle size, parking class, parking angle and supply the four required values.
Select a layout number (top row in Standard Layouts dialog box) then click Remove Layout to remove the layout from the parking standard.
Click Save to save changes to the parking standard.
Allows for user created parking standards to be renamed.
Deletes the selected user created parking standard from the computers hard drive. The parking standard will no longer be available.