GuideSIGN Plus 2024 Help
This feature is not available in GuideSIGN SIGMA.
Allows you to place an exit panel.
Note: To create a custom exit panel using CAD functionality see Creating Custom Exit Panels in CAD.
Displays the panel style, drawing units, and M.U.T.C.D. Edition of the currently selected panel.
Note: The M.U.T.C.D. Edition determines the choice of exit panel templates under Browse for Exit Panel (e.g. if the current M.U.T.C.D. Edition is the 1988 one, the M.U.T.C.D. 2003 Edition exit panel templates will not display under Browse for Exit Panel). For information on how to specify the M.U.T.C.D. Edition, see Program Settings' General - Design Category.
Allows you to select an exit panel library and an exit panel.
Note: User created exit panels display with the  custom graphic in the browse tree.
Allows you to specify the number of exit panels displayed in the preview area below.
Displays the preview of the exit panels contained in the route shield library that is currently open under Browse for Exit Panel.
| Button | Option | Click to... |
  |
Previous / Next | Preview the next / previous group of exit panels. |
  |
Zoom In / Zoom Out | Zoom the selected exit panel to the full viewing area. |
 |
Information | Get information on the selected exit panel. |
Exit panels consist of a single cell (or block) composed of a nested panel and one or more text strings or symbols. The only difference between an exit panel and a sign panel is that when a panel created with an exit panel style is updated, the panel and any text or symbols contained in its range are enclosed inside a cell (or block). This allows you to manipulate exit panels as single objects.
When an exit panel is placed using the Place Exit Panel tool, the panel component is automatically updated to accommodate exit numbers or to match corner radii with the sign it is placed in. This update is done using the style originally used to create the exit panel.
Before an exit panel can be edited, the complex status must first be dropped (the block exploded).
The categories of exit panels provided are described below.
| Exit Number Panels |
Are separate panels located outside the sign, usually at the upper-left or upper-right corner. Contain exit numbers. The color and border match the sign. Automatically relocate when the sign is updated, to maintain their relative position. |
| Exit Only Panels |
May be located:
Usually contain the message 'EXIT ONLY' and may contain arrows. They are usually yellow with rounded corners. Update automatically with the sign (except floating types) so the corner radii match. |
| Left Exit Panels | Are similar to Exit Only Panels except that they contain the message 'LEFT EXIT'. |
Examples of exit panels are shown below.
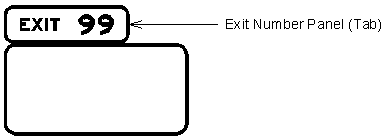
Exit number panel example
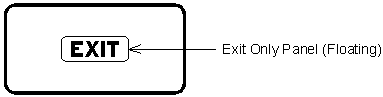
Exit only panel example
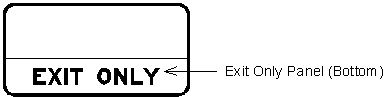
Exit only panel example
A quick change to an exit panel can be accomplished by simply editing the style used to create one of the supplied exit panels. This could be used to create an exit panel with no bottom border, for example, or to change the panel color or border thickness.
Note:
If the desired arrangement of text and symbols is not available in any of the supplied exit panels, a new exit panel can be created on the fly, without using the Place Exit Panel tool. This is done by carrying out the same steps as are used to create any sign panel.
The options for a panel type are listed in the following table.
| Tab | Use for exit number panels located outside the sign, usually at the upper-left or upper-right corners. |
| Floating | Use for exit only or left exit panels that can be placed anywhere in a sign panel. |
|
Top Bottom |
Use for exit only or left exit panels that attach to the top or bottom of a sign and extend across the full width. |
|
Top Left Top Right Bottom Left Bottom Right Left Right |
Use for exit only or left exit panels that attach to one of the corners of a sign. |
After an on-the-fly exit panel has been created, it can be positioned in or next to a sign.
Since most users want to add to or modify the exit panel libraries supplied with the software, you may begin by copying the original library to a new user defined library file (see also Adding Objects to Custom Libraries).
You are recommended to store custom exit panel libraries in appropriate folders. For information on the structure of the exit panel folders created by the software in the Contents User folder, see Customizing GuideSIGN Plus -> Saving User Created Content.
Note: For the purpose of consistency, an exit panel library should contain exit panels created using the same units and M.U.T.C.D. Edition.