
The Select Object dialog box displays whenever an object is to be selected from the AviPLAN Airside Pro library. The tabs and functions available in this dialog box are dynamically controlled depending on the functionality in the command from which it is opened.
This is by default set to Library, but in the event that user-defined vehicles have been created using Vehicle Editor or user-defined airplane groups have been created using the Group Manager, additional options will also be available for selection in the Vehicle and Airplane tabs respectively.
The Search box assists in selecting an object from the database. By typing the first few characters of the object name, manufacturer or designator, objects matching the input are shown in the table.
By default, the Configuration selection dialog box is set to AviPLAN Default. After the table columns have been selected and configured (as explained below), and the filters have been set (as explained below), the current Search and Filter configuration of the table can be saved under a unique name for repeated use.
For example, you wish to be able to quickly review and compare jet blast contour lengths for a particular Code Letter (ADG) of airplane. Configure the columns to show only the airplane design group and breakaway distance for 56 km/h (35 mph) and 80 km/h (50 mph), then filter the Code Letter (ADG) column to only show the category of interest, sort the jet blast columns to show the longest distance at the top. Now click the Save copy of selected configuration button, specify a name, and then click OK.
 Save selected configuration
 Save copy of selected configuration
 Delete selected configuration
The table columns that display can be configured and the content in the table can be sorted and filtered by the user. Two buttons to the right of the Configuration dialog box can be used in this process.
![]() Clear all filters applied to column(s) in the table.
Clear all filters applied to column(s) in the table.
![]() Select and arrange the table columns to be displayed. This displays the Configure Columns List dialog box.
Select and arrange the table columns to be displayed. This displays the Configure Columns List dialog box.
Sorting and/or filter options are available in the headers of many table columns.
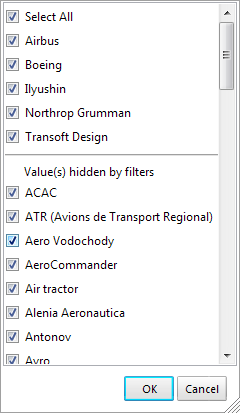
To filter, the triangle at the right of the column header is clicked. If the column contains text, for example manufacturer names, all manufacturers are listed with a checkbox in front of each manufacturer name. At the top there is also a Select All option that allows to select or unselect all available choices. If the list is longer than the displayed window, there is a scroll bar at the right side. Images below show the filter menu for the Manufacturer column under the Airplanes, Helicopters, and Vehicles tab respectively.
For columns with numeric information there is the option to filter the content to a certain range of the values. Click the triangle to show the filter menu and indicate the range minimum and maximum followed by confirmation with the OK button.

Several columns can be filtered. If a filter is applied, the header of the column displays the filter icon (![]() ).
).
All filters can be cleared with the Clear Filter button (see Table buttons above).
Filter menus are intelligent and show the dependence in case filters for multiple columns are being applied. For example, if under the Code/Group column Code E is selected (for ICAO or EASA) or Group V (FAA), thereafter the filter menu in the Manufacturer column is divided into two parts;

Sorting of columns from A-Z, Z-A, low-high or high-low values can be achieved simply by clicking the column header. When A to Z sorting or low to high sorting is active an arrow pointing upwards is visible in the header. When Z to A or high to low sorting is active the displayed arrow points down.
Images below show the filter menu for the Manufacturer column under the Airplanes, Vehicles and Bridges tabs respectively.
Below the data table, a preview of the active object is displayed. To the right of this preview, Source Info and Revision History tabs show relevant information regarding data source and any modifications made to the object since its introduction in the AviPLAN Airside Pro 1.0 library.
Clicking this button launches the Group Manager command, for creating a new or editing an existing airplane group.
Clicking this button opens the Service Editor dialog box for creating a new or editing an existing airplane service arrangement.
Clicking this button opens the Vehicle Editor dialog box for creating a new or editing an existing vehicle.
Clicking this button launches the Bridge Editor command, for creating a new or editing an existing passenger boarding bridge.
Clicking this button confirms the object selection made in the table and closes the dialog box.
Clicking this button cancels the current action and closes the dialog box.