GuideSIGN Markings 2024.8.2

Several different routines are provided to allow simple insertion of hatched areas in different circumstances. There are 3 main ways of drawing these – Triangular, Area & Central hatchings.
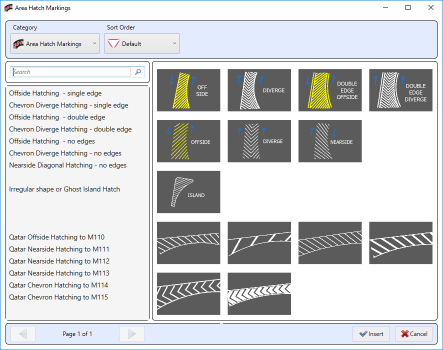
There are many options: Urban, Rural or Motorway, Nearside or Center Offside 45, and Merge or Diverge chevron. The options are presented through a series of thumbnail items.

However, all of the triangular routines draw in a similar way, although there are differences in the final hatching and side marking lines drawn. The hatching with no edges still require you to draw along those blank sides, but no striping will be drawn along that side at the end of the process. These blank sided hatches are useful when you just want to add diagonals to an area where you have already drawn the edge stripings.
To draw:
Note
The sides in 2 & 3 can be straight lines or arcs using the principle 2 points & Enter = straight line, but 3 points = an arc, as described for normal line markings in Short Lines - Stop and Give Way Lines (Transverse).
When the first prompt in the command is offered (for the apex) there are also a couple of alternative options: (a) F for Fixed distance from – This allows the apex to be positioned at 2m from an existing marking. The apex will then start with the correct gap from an existing marking such as a center line. (b) Split Road – again this allows the apex to be accurately positioned in the center of the carriageway. (c) W for Wide end – This allows both sides to be drawn backwards, from the wide end of the hatching, such as when the hatching runs up to an island. The points picked for the curved sides would be reversed, so would be in the order 2, 1 & Enter, 5, 4, 3 & Enter.
The Area Hatch commands do not differ very much from the above. They have a similar set of different types like the triangular and the only difference for these Area Hatchings is that the two sides do not have a common apex. The markings again are obtained from a thumbnail menu.
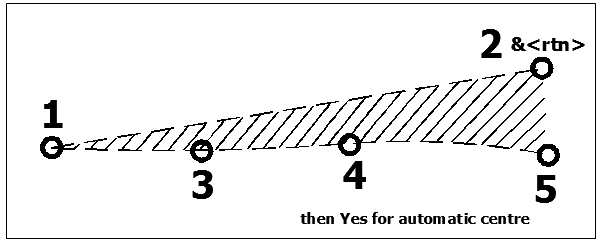
To draw:
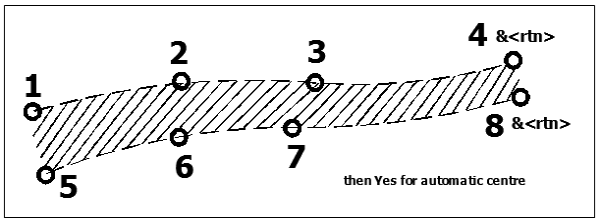
To draw:
Chevron hatching can be also constructed using this method, with the imaginary line also forming the line apexes of the chevrons. If you require this line to be off-centre then answer No to the automatic question and then draw it where you want, or answer Yes and edit the line after the hatch has been automatically drawn.
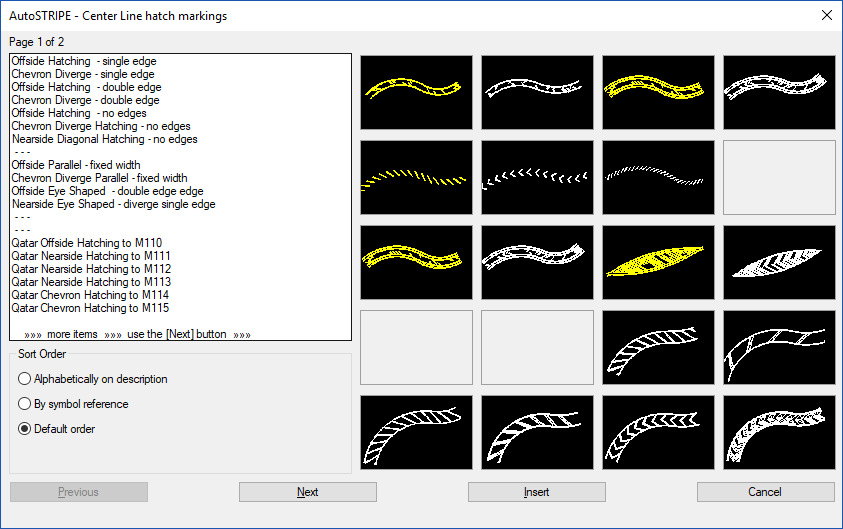
The central hatchings draw parallel edges, similar those that can be drawn with area hatching because there is no apex, but with central hatching they are drawn with an identical width throughout. The main benefit of this type is that they can be drawn very quickly.
To draw:
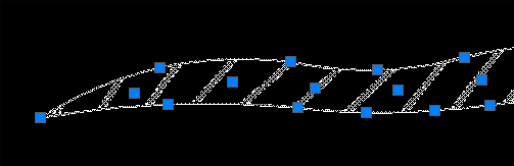
One feature of the hatching is that after the complex marking has been drawn, the edge lines can be adjusted by picking them and their blue grips. The diagonals are automatically redrawn when the hatch boundaries change. Care should be taken when adjusting the blue grip of the centre imaginary line. It is very easy to place kinks in the line between segments. If this happens then the angle of the hatching lines will alter dramatically between one diagonal and the next. To rectify this, the centre grips need to be adjusted again until the segments of the imaginary line run tangentially into one and another.