In This Topic
Allows a tutorial to be recorded.
To Record a Tutorial
- Open the desired drawing file.
- Zoom into the appropriate area where the tutorial will take place.
- In the Tutorials dialog box, click Record.
- In the New Tutorial dialog box, type a name for the tutorial and then click OK. The Record Tutorial Step dialog box displays:
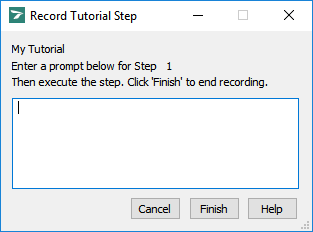
- Type the instructions for the user to follow for the current step. GuideSIGN Plus will display these instructions in a dialog box when the tutorial is played.
- Click the tool on the ribbon or toolbar or perform the action described in the tutorial step. The user will be required to use this tool or pick the highlighted point when the tutorial is played.
- After a tool or point is clicked, the tutorial system advances and the next step's screen displays.
- Repeat steps 4 and 5 until you have reached the end of the tutorial.
- Click Finish to end recording and return to the Tutorials dialog box.
- Click Close to close the Tutorials dialog box.
Note:
- Describe as accurately and succinctly as possible the sequence of steps for the user to follow the tutorial. (Try the supplied tutorials to get a better idea of how to phrase the prompts as briefly as possible.)
- Tutorials must contain only one instruction per step.
- Every button click the user will have to execute when playing the tutorial must be recorded as a separate step. This includes the OK/Close button clicks needed to close dialog boxes.
Saving Tutorials
Since a drawing file used for a tutorial is associated with the tutorial, both the tutorial and the drawing must be copied to the Tutorials subfolder.
The tutorials you create are stored in the Tutorials User folder located in the User Data folder. If you have manually moved the Tutorials User folder to a different location, use GuideSIGN Configuration Utility to modify the program settings accordingly.
To make user-created tutorials available to all users, move the Tutorials User folder to the server location, and then adjust each workstation to look for user tutorials at the server location.