GuideSIGN Plus 2024 Help
This feature is not available in GuideSIGN SIGMA.
Allows you to move a group of one or more objects relative to another group of one or more objects.
For information on moving single objects relative to all objects in a sign panel, see Move Single Object.
The software provides several snap modes for moving objects. Dragging the pointer moves the bounding box of the object to the nearest snap position.
| Snap Mode | Description |
| Off | The object can be placed anywhere. |
| To objects |
Snaps to other objects in the same sign panel. There are 12 snap positions around the outside of each object. To manually set the object spacing, select the Manual spacing check box, and then type the desired horizontal and vertical spacing values in the Horizontal and Vertical boxes respectively. |
| To margins |
Snaps to the margins of the sign panel. There are 9 snap positions around the margins of a sign panel. To manually set the margin spacing, select the Manual spacing check box, and then type the desired left, right, top and bottom spacing values in the Left, Right, Top, and Bottom boxes respectively. |
| To panel | Snaps to anywhere on the sign panel perimeter. Usually used to place exit number panels. There are 12 snap positions around the outside of a sign panel. |
| To border (short line only) |
Snaps to the linear border of the sign panel.
To manually set the border spacing, select the Manual spacing check box, and then type the desired value in the Distance to border box. The distance is measured between the inside of the border and the nearest side of the short line. |
| Point to point |
Snaps the placing object relative to a fixed object by specifying a distance between selected snap points on each. To specify the horizontal and vertical distances between the snap points (one on the placing object and one on the object in the sign panel), type the desired values in the Horizontal and Vertical boxes respectively. Note: When placing short lines, this mode is only available if Fix was selected under Line Length in the Place Short Line dialog box. |
| Center objects (with a short line as the fixed object) |
Snaps a selected group of objects to the center of the area between the inside of the panel border and a short line snapped to the panel border based on the panel style's margin settings. Note: The Center objects mode is only available when a short line is selected as the fixed object. |
| To panel's edge |
Snaps to the edge of the panel. Note: This option works best if the panel's Width and/or Height are Locked or if Auto update panel is off. |
Note: Not all Snap Modes are available for all objects.
Select this check box to allow the horizontal or vertical object spacing, or margin spacing to be manually set.
When moving an existing object, either the X or Y coordinates can be held fixed. This is similar to setting the axis lock in MicroStation or using ortho mode in AutoCAD/BricsCAD.
After you select an object to be moved, a corresponding bounding box will display in the drawing area so you can preview the new position of the object. As you move the pointer choosing a new place for the selected object, the bounding box will move accordingly, displaying the available positions that may differ depending on the current snap mode and Fix X/Y settings.
Note: Either the moving or fixed object groups can consist of a single object, and all objects in the sign that are not part of either group will be ignored.
It is possible to center a group of one or more objects between the inside of the panel border and a short line (see Place Short Line) by selecting the short line as the fixed object when using the Move Multiple Objects tool. A group of objects can also be centered between two short lines (in this case, the software will ignore the panel's margin settings when it calculates the group's new location). The Center objects snap mode will situate the objects between the short line and the border (or two short lines) using the sign panel's margin settings. If a vertical short line is selected as the fixed object, only the horizontal margin settings will affect the group's new location. If a horizontal short line is selected, only the vertical margin settings will be used.
Note: This procedure requires that at least one short line snapped to the inside of a panel border be placed in a sign panel (see Place Short Line).
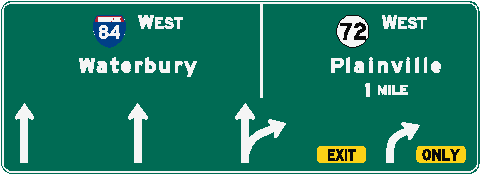
Objects between the vertical short line and the sign's right border need to be centered

Moving group selected
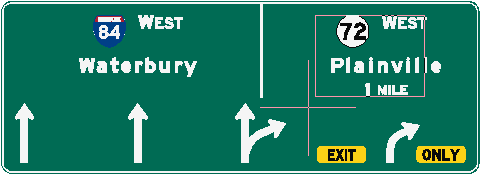
Moving group's centered location preview
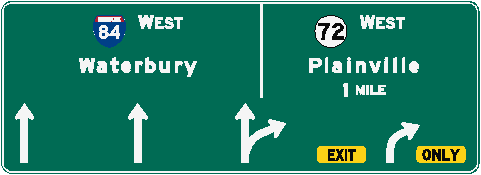
Objects centered between the vertical short line and the sign's right border