GuideSIGN Markings 2024.8.2
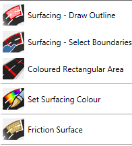
A symbolic representation of an area of carriageway to be surfaced with a colored surface can be easily drawn in three different ways:
In all cases, the color used on the drawing to show the surfacing can be set using the ProductName%% settings or the set surfacing color item in the menu.
Any area of hatched road marking created by the automatic hatching routines can be filled with shading to represent colored road surfacing. This default action is preset in the program options, but the individually properties of the diagonal road markings allow the color to be toggled on or off.
These are two alternative surfacing items. They are a symbolic representation of an area to be surfaced with either high-friction surface or for the ripple warning materials respectively.
They are drawn by the first method above (drawing around the outline of the area) and then confirming the angle at which the hatch pattern should be drawn.
The representation of the area of surfacing is created on a separate layer from the colored surfaces and also has separate settings for the pattern and layers used.