GuideSIGN Markings 2024.8.2
The details of the display on the monitor when you have loaded GuideSIGN Markings will depend on the CAD platform onto which you have loaded GuideSIGN Markings. They will generally follow the layout below.
The layout may differ by minor amounts with any of the recent releases of new versions of AutoCAD.
When you have loaded GuideSIGN Markings, you will see the major part of the screen is blank with cursor for drawing, usually with additional areas around the top, bottom and sides.
A single line across the top of the screen will display the AutoCAD program name and current drawing name.
Below this, an optional worded menu line contains commands, which can be highlighted to pop-down further sub-commands related to that title. GuideSIGN Markings commands should be visible in this section if the program is correctly loaded. Below the menu line, you may find icon buttons which offer a more frequently used method of initiating commands. These may also occur down the sides of the screen, or be floating in the drawing area. In common with Windows programs, these can be manipulated by the user.
In R2010 and newer, there is a toolbar ribbon which gives access to a great number of icons and commands, and there are tabs at the top for GuideSIGN Markings.


Towards the bottom of the screen, (and possibly near the cross hairs), there will be an area where commands can be typed. System responses are also displayed here. It is important that users watch this command area closely, as this is where GuideSIGN Markings will display prompts for user input.
Finally, on the bottom line of the display, a status bar displays the current co-ordinates and a wealth of status icons and functions. Most of these status items can be selected to toggle them on or off as required.
These areas are identified on the image of the screen below.

The display will only differ by minor amounts with different series of Microstation v8i.
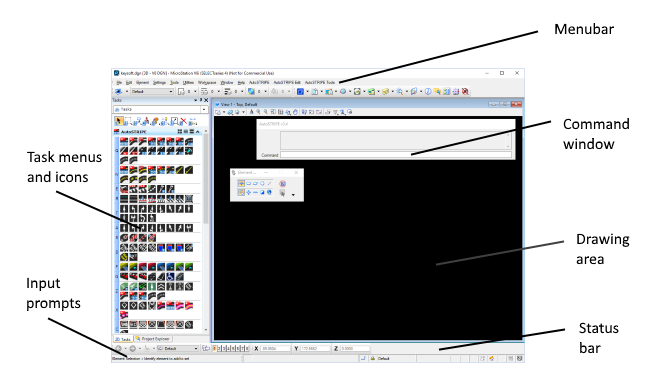
When you have loaded GuideSIGN Markings, you will see the major part of the screen is blank with cursor for drawing, usually with additional areas around the top, bottom and sides:
A single line across the top of the screen will display the AutoCAD program name and current drawing name.
Below this, a worded menu line contains commands, which can be highlighted to pop-down further sub-commands related to that title. Three sets of GuideSIGN Markings commands should be visible in this section if the program is correctly loaded.
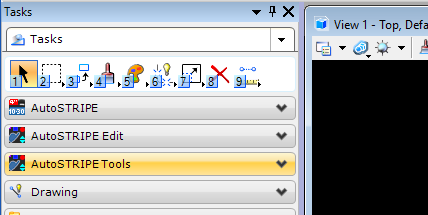
To the left of the main drawing area, is the task menu which has many rows of icons. These icons have identical GuideSIGN Markings commands to the pull down text menu items. There are three sections containing the GuideSIGN Markings functions. You may need to expand different sections, depending on which command or function you want to use.
Floating in the drawing area is a small dialog called the Command window. This will display text about the current command being used and which items or points should be selected. There are often options when a command is used and these will be displayed here as letters that can be typed on the keyboard. Finally, on the bottom line of the display, a status bar displays the current coordinates and a wealth of status icons and functions. Additonal input prompts are usually displayed in this bottom line. These areas are identified on the image of the screen below:
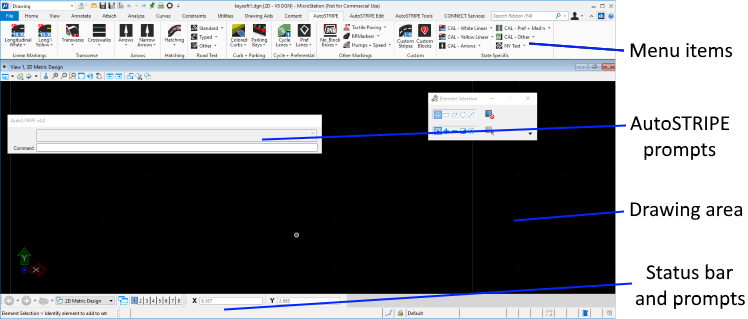
The display within Connect versions of Microstation is noticeable different to the Select Series.
When you have loaded GuideSIGN Markings, you will see the usual major part of the screen is blank with cursor for drawing, but the cmmands are now access via a ribbon menu along the top. Toolbar and task menus are usually turned off by default but can be turned on using Microstation settings.
The ribbon menu has a number of tabs and when GuideSIGN Markings was started three additional GuideSIGN Markings menu tabs were added.


GuideSIGN Markings commands and functions can be selected from these ribbon menu items. The usual Microstation prompts can be found on the bottom bar and additonal GuideSIGN Markings prompts are displayed in the command text window.